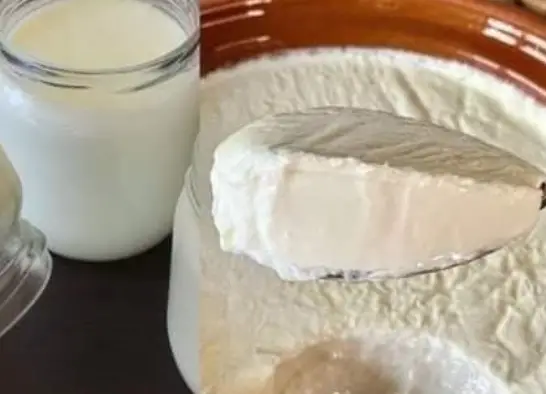
Have you ever dreamed of creating yogurt so velvety and smooth it resembles the texture of stone?Well, dream no more! In this exclusive recipe, we’ll unlock the secret to crafting yogurt with unparalleled richness and creaminess that will elevate your culinary creations to new heights. Get ready to embark on a journey of flavor and texture that will leave you mesmerized!
Yogurt is a versatile and beloved ingredient in countless dishes around the world. From creamy sauces to indulgent desserts, its unique tanginess and velvety texture add depth and richness to a wide array of recipes. However, achieving the perfect texture can often be a challenge, with many homemade yogurts falling short of the smoothness and creaminess we desire. But fear not, for we are about to unveil the secret to crafting yogurt with the texture of stone – a culinary masterpiece that will delight your senses and impress even the most discerning palates.
Ingredients
- 1 quart of whole milk
- 2 tablespoons of plain yogurt with active cultures (as a starter)
- A pinch of salt (optional, for enhancing flavor)
- Sweeteners or flavorings of your choice (optional)
Instructions
1. Heat the Milk:
- Pour the whole milk into a large, heavy-bottomed saucepan and place it over medium heat. Heat the milk gradually, stirring occasionally to prevent scorching, until it reaches a temperature of around 180°F (82°C). Heating the milk to this temperature helps to denature the proteins and create a smoother texture in the finished yogurt.
2. Cool the Milk:
- Once the milk has reached the desired temperature, remove it from the heat and allow it to cool to around 110°F (43°C). You can speed up the cooling process by placing the saucepan in an ice bath or transferring the milk to a clean container and placing it in the refrigerator for 30-45 minutes.
3. Add the Starter:
- Once the milk has cooled to the appropriate temperature, add the plain yogurt with active cultures to the saucepan and stir gently to combine. The live cultures in the yogurt will act as a starter and begin the fermentation process, transforming the milk into yogurt.
4. Incubate the Yogurt:
- Transfer the milk and yogurt mixture to a clean, airtight container and cover it securely. Place the container in a warm, draft-free location to incubate for 8-12 hours. You can use a yogurt maker, an insulated cooler, or simply wrap the container in towels to maintain a consistent temperature of around 110°F (43°C) during incubation.
5. Check for Doneness:
- After the incubation period, check the yogurt for doneness by gently tilting the container. The yogurt should have a thick, creamy consistency and may have a slightly tangy aroma. If the yogurt is still runny, continue incubating for another 2-4 hours until it reaches the desired consistency.
6. Chill and Serve:
- Once the yogurt has reached the desired thickness, transfer it to the refrigerator to chill for at least 4 hours or overnight. Chilling the yogurt helps to firm up the texture and enhance the flavor. Once chilled, serve the yogurt plain or with your favorite sweeteners, fruits, or flavorings.
Cook’s Notes and Variations
- Creamier Texture: For an even creamier texture, you can add a small amount of heavy cream or powdered milk to the milk before heating it. This will increase the fat content of the yogurt and result in a richer, smoother finished product.
- Flavor Variations: Experiment with different flavorings and sweeteners to customize your yogurt to suit your taste preferences. Consider adding honey, maple syrup, vanilla extract, or fruit preserves for a touch of sweetness, or mix in chopped nuts, seeds, or spices for added texture and flavor.
- Thickening Agents: If you prefer a thicker yogurt, you can add a small amount of gelatin or agar-agar to the milk before heating it. These natural thickeners will help to stabilize the yogurt and create a denser consistency.
Keto and Low-Carb Versions
For those following a keto or low-carb diet, you can easily adapt this recipe to suit your dietary needs:
- Keto-Friendly Option: Use full-fat milk or cream and choose a plain yogurt with no added sugars or flavors as your starter. Skip the sweeteners and flavorings, or use keto-friendly sweeteners such as stevia or erythritol in moderation.
- Low-Carb Variation: Opt for unsweetened almond milk or coconut milk as a dairy-free alternative to whole milk. Keep in mind that coconut milk tends to yield a thicker and creamier yogurt compared to almond milk.
Frequently Asked Questions (FAQs)
Q: Can I use skim or low-fat milk to make yogurt? A: While you can use skim or low-fat milk to make yogurt, keep in mind that the resulting yogurt may have a thinner consistency and less richness compared to whole milk yogurt. For best results, choose whole milk for a creamier texture.
Q: How long will homemade yogurt keep in the refrigerator? A: Homemade yogurt will typically keep for up to 1-2 weeks when stored in an airtight container in the refrigerator. Be sure to check for any signs of spoilage, such as off odors or mold growth, before consuming.
Q: Can I use store-bought yogurt as a starter for homemade yogurt? A: Yes, you can use store-bought yogurt with live active cultures as a starter for homemade yogurt. Look for plain yogurt with no added sugars or flavors, as these can interfere with the fermentation process.
Unlock the secret to crafting yogurt with the texture of stone and elevate your culinary creations to new heights with this exclusive recipe. By following these simple steps and incorporating a few key tips and variations, you can create homemade yogurt that rivals the creaminess and richness of your favorite artisanal brands. Whether enjoyed plain or customized with your favorite flavorings and toppings, this homemade yogurt is sure to delight your taste buds and leave you craving more. So gather your ingredients, embrace your inner chef, and prepare to experience the magic of homemade yogurt like never before!
