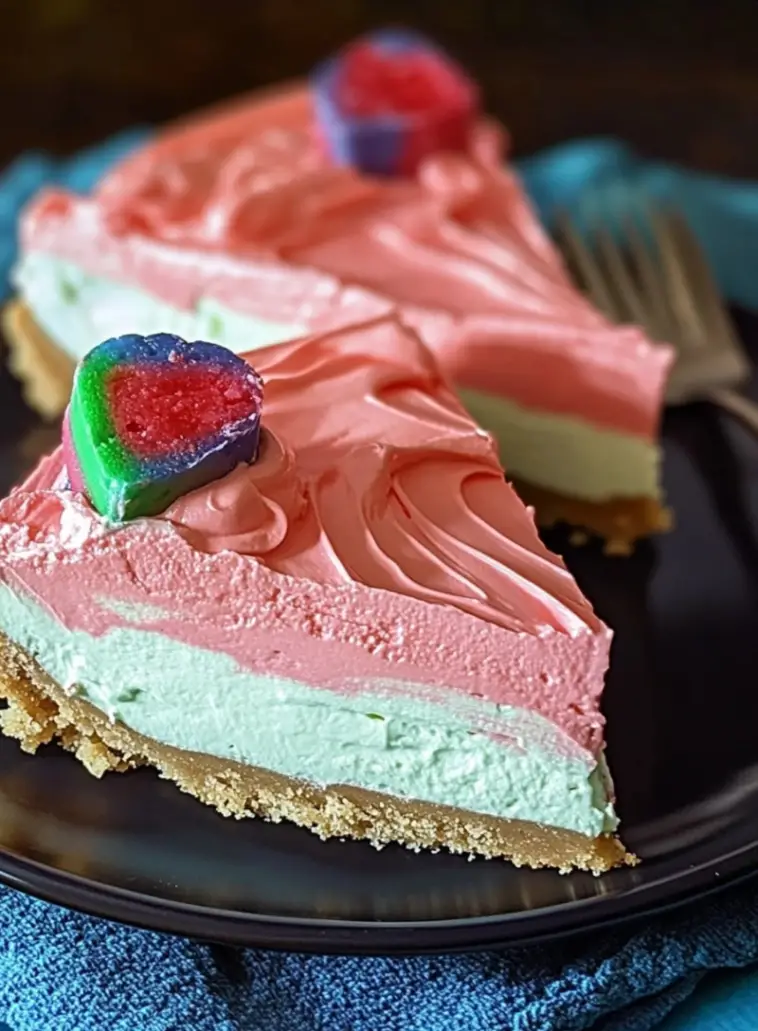
If you’re looking for an easy, no-bake dessert with a fun twist, this Kool-Aid Cheesecake is a perfect choice! This recipe combines the creamy texture of cheesecake with the tangy flavor of Kool-Aid, resulting in a vibrant and flavorful dessert that requires minimal effort. With a graham cracker crust and a cool, whipped filling, this cheesecake is both refreshing and delicious.
In this post, I’ll show you how to make this unique and fun dessert, along with a variation for a classic no-bake cheesecake. Let’s get started!
Ingredients for Kool-Aid Cheesecake
For the Crust:
- 1 ½ cups graham cracker crumbs
- ¼ cup sugar
- ½ cup melted butter
For the Filling:
- 1 tub (8 oz) Cool Whip
- 1 package (8 oz) cream cheese, softened
- 1 cup sugar
- 1 packet of Kool-Aid (any flavor of your choice)
- 1 can sweetened condensed milk (optional for added creaminess)
Instructions for Making Kool-Aid Cheesecake
Step 1: Prepare the Graham Cracker Crust
- Mix the Crust Ingredients: In a medium bowl, combine 1 ½ cups of graham cracker crumbs, ¼ cup of sugar, and ½ cup of melted butter. Stir until the crumbs are well coated.
- Press into the Pan: Press the graham cracker mixture evenly into the bottom of a 9-inch pie pan or springform pan, forming the crust. Use the back of a spoon to press it down firmly.
- Chill the Crust: Place the crust in the refrigerator to set while you prepare the filling.
Step 2: Make the Cheesecake Filling
- Beat the Cream Cheese: In a large mixing bowl, beat the softened cream cheese until smooth and creamy.
- Add the Sugar: Gradually add 1 cup of sugar and continue to beat until fully combined and smooth.
- Add the Kool-Aid: Sprinkle the packet of Kool-Aid into the cream cheese mixture. Beat until the mixture turns a vibrant color and the Kool-Aid is fully incorporated.
- Fold in the Cool Whip: Gently fold in the tub of Cool Whip until the mixture is light and fluffy. If you prefer an even creamier texture, you can also mix in 1 can of sweetened condensed milk at this point.
Step 3: Assemble the Cheesecake
- Fill the Crust: Pour the cheesecake filling into the prepared graham cracker crust, spreading it evenly.
- Chill the Cheesecake: Refrigerate the cheesecake for at least 4 hours, or until fully set. For best results, refrigerate overnight.
Step 4: Serve
- Garnish and Serve: Once the cheesecake is set, slice and serve chilled. You can garnish with whipped cream, fresh fruit, or even additional graham cracker crumbs if desired.
Cooking Notes
- Kool-Aid Flavor: Choose your favorite Kool-Aid flavor for the filling. Popular choices include strawberry, cherry, grape, and lemon-lime. Each flavor will give your cheesecake a different color and taste.
- Cream Cheese Substitute: If you want a lighter option, you can substitute the cream cheese with Neufchâtel cheese, which has less fat but maintains a similar texture.
- Crust Variations: Instead of graham crackers, you can use Oreo cookie crumbs or vanilla wafers for a fun twist on the crust.
Variations of Kool-Aid Cheesecake
Classic No-Bake Cheesecake
If you prefer a classic cheesecake without the Kool-Aid flavor, simply omit the Kool-Aid packet and proceed with the same instructions. You can also add 1 teaspoon of vanilla extract for a traditional cheesecake flavor. Top with fresh fruit or fruit preserves for an elegant touch.
Kool-Aid Jello Cheesecake
For a fun, fruity twist, you can substitute the Kool-Aid packet with 1 package of Jello (flavor of your choice). The Jello will add flavor and help the cheesecake filling firm up nicely. Follow the same instructions, but note that the Jello will give the filling a slightly different texture.
Fruit Kool-Aid Cheesecake
Add a fruity element by mixing in ½ cup of fresh or frozen fruit that complements your Kool-Aid flavor. For example, pair strawberries with strawberry Kool-Aid, or pineapple chunks with tropical punch Kool-Aid.
Frequently Asked Questions (FAQs)
1. Can I make this cheesecake ahead of time?
Yes! This Kool-Aid cheesecake is great for making ahead. Simply prepare the cheesecake, cover it, and store it in the refrigerator for up to 2 days before serving. It’s a perfect make-ahead dessert for parties and gatherings.
2. How long does this cheesecake need to chill?
For the best texture and flavor, the cheesecake should chill for at least 4 hours, but overnight is ideal. This allows the filling to fully set and the flavors to develop.
3. Can I use homemade whipped cream instead of Cool Whip?
Yes! If you prefer homemade whipped cream, you can use it in place of Cool Whip. Simply beat 1 cup of heavy whipping cream with 2 tablespoons of powdered sugar until stiff peaks form, then fold it into the filling.
4. Can I freeze Kool-Aid cheesecake?
Yes, you can freeze the cheesecake for longer storage. Wrap it tightly in plastic wrap and aluminum foil, then freeze for up to 1 month. Thaw in the refrigerator overnight before serving.
5. What can I use instead of graham cracker crust?
You can use other cookie crumbs, such as Oreos, vanilla wafers, or shortbread cookies to create a different type of crust. Simply follow the same method for making the crust.
Kool-Aid Cheesecake is a fun, no-bake dessert that’s sure to be a hit at any gathering. With its tangy, fruity filling and buttery graham cracker crust, this cheesecake is both easy to make and bursting with flavor. Whether you stick to the Kool-Aid version or opt for a classic no-bake cheesecake, this recipe is a delicious, fuss-free way to satisfy your sweet tooth.
Enjoy this cool and creamy dessert, and get creative with your favorite flavors and toppings!


