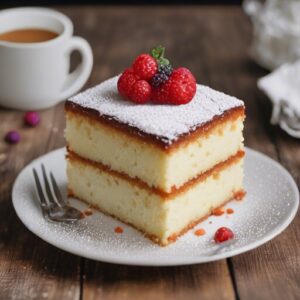
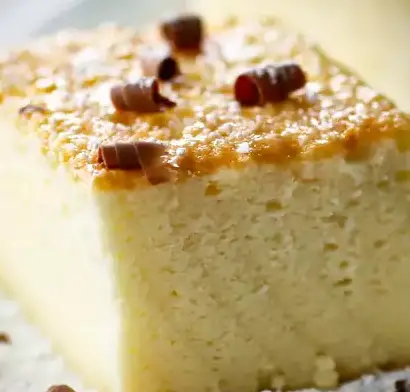
Prepare to be mystified by the culinary sorcery of the Magic Cake! This seemingly ordinary batter transforms into a tri-layered marvel as it bakes, creating a cake with a delicate custard layer at the bottom, a creamy center, and a light sponge on top. If you’ve ever wondered about the secrets behind this enchanting dessert, you’re in for a treat. Join us as we delve into the world of Magic Cake, unraveling the mystery and guiding you through the steps to create a spellbinding culinary experience.
Ingredients
Refrigerated
- 4 Eggs
Baking & Spices
- 3/4 cup All-purpose flour
- 2 tbsp Confectioners’ sugar
- 1 tsp Vanilla extract
- 3/4 cup White sugar
Dairy
- 1/2 cup Butter
- 2 cups Milk
Instructions
Step 1: Preheat and Prepare
Preheat your oven to 325°F (160°C). Grease a square or rectangular baking dish, ensuring it’s ready to work its magic.
Step 2: Melt the Butter
In a saucepan over low heat, melt the butter. Allow it to cool slightly while you move on to the next step.
Step 3: Separate and Beat
Separate the egg whites from the yolks. In a bowl, beat the egg whites until stiff peaks form. Set them aside for now.
Step 4: Sugar Alchemy
In a separate bowl, whisk together the egg yolks and white sugar until the mixture becomes pale and slightly thickened.
Step 5: Vanilla Elixir
Add the vanilla extract to the egg yolk mixture, whisking it in to infuse the batter with a touch of vanilla magic.
Step 6: Butter Fusion
Gradually add the melted butter to the egg yolk mixture, whisking continuously. This step introduces the richness that makes the custard layer of the Magic Cake.
Step 7: Flour Integration
Gently fold in the all-purpose flour, ensuring there are no lumps. This forms the base of the cake’s sponge layer.
Step 8: Milk Concoction
Warm the milk slightly, either on the stove or in the microwave. Gradually add the warm milk to the batter, whisking until well combined. The batter will be thin – don’t be alarmed; this is part of the enchantment!
Step 9: Whipped White Clouds
Carefully fold the stiffly beaten egg whites into the batter. This incorporation adds a lightness that contributes to the cake’s final ethereal texture.
Step 10: Bake to Perfection
Pour the batter into the prepared baking dish and bake in the preheated oven for 45-60 minutes or until the top is golden brown, and the center is set but still slightly jiggly.
Step 11: Cool and Chill
Allow the Magic Cake to cool completely in the baking dish. Once cooled, refrigerate for at least 2 hours or overnight for optimal texture and flavor development.
Cook Notes
- Patience Pays Off: The cooling and chilling steps are crucial for the layers to set properly. Resist the temptation to cut into the cake too soon.
- Customize with Citrus: Enhance the magic by adding a touch of citrus zest, such as lemon or orange, to the batter for a refreshing twist.
- Serve with Style: Dust the chilled Magic Cake with an extra sprinkle of confectioners’ sugar before serving for an elegant finish.
Variations
Chocolate Enchantment
Add 1/4 cup of cocoa powder to the flour for a chocolatey version of the Magic Cake. The result is a heavenly blend of chocolate and custard layers.
Berry Bliss
Gently fold in fresh berries such as raspberries or blueberries into the batter before baking. The burst of fruity goodness adds a delightful surprise in each bite.
Keto Versions
Almond Alchemy
Substitute almond flour for all-purpose flour to create a keto-friendly Magic Cake. The almond flour provides a nutty flavor while keeping the carb content low.
Monk Fruit Magic
Replace white sugar with monk fruit sweetener for a keto-approved alternative. Adjust the quantity based on your desired level of sweetness.
Low-Carb Versions
Coconut Charm
Use coconut flour instead of all-purpose flour for a low-carb adaptation. Coconut flour imparts a subtle coconut flavor while reducing the carb content.
Stevia Sorcery
Opt for a low-carb sweetener like stevia in place of sugar. This modification allows you to enjoy the Magic Cake with minimal impact on carbohydrate intake.
Frequently Asked Questions (FAQs)
1. Why is my Magic Cake not setting in the center?
The custard layer in the center should be slightly jiggly when you remove the cake from the oven. It will set further as it cools and chills.
2. Can I use a different type of milk?
Yes, you can experiment with different types of milk, such as almond or coconut milk, for a variation in flavor. Keep in mind that it may affect the texture slightly.
3. Can I make this ahead of time?
Absolutely. In fact, the Magic Cake benefits from being made a day in advance. The flavors meld, and the layers set even more, resulting in a truly magical experience.
4. Can I freeze the Magic Cake?
While the cake can be frozen, it’s best enjoyed fresh or refrigerated for the optimal texture. If freezing, wrap it tightly to prevent freezer burn.
5. Why is it called Magic Cake?
The name comes from the enchanting transformation that occurs during baking, creating distinct layers with varying textures from a single batter.

As you savor the ethereal layers of the Magic Cake, you’re not just indulging in a dessert; you’re experiencing a culinary marvel. Whether you stick to the classic recipe, explore creative variations, or opt for keto and low-carb adaptations, each slice is a journey through layers of flavor and texture. Share this magical creation with friends and family, and let the enchantment of the Magic Cake captivate every palate. Magic Cake – where simplicity meets sorcery, resulting in a dessert that defies expectations.


