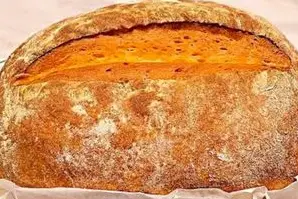
There’s something truly special about the aroma of freshly baked bread wafting through your home. If you’ve ever dreamed of creating your own homemade bread from scratch, you’re in the right place! In this comprehensive guide, we’ll take you through the step-by-step process of making delicious homemade bread that’s perfect for sandwiches, toast, or simply enjoying with a smear of butter. Get ready to roll up your sleeves and embark on a baking adventure that’s sure to fill your kitchen with warmth and comfort.
Ingredients:
- 1/4 cup warm water (for activating the yeast)
- 1 teaspoon dry yeast
- 1/3 cup all-purpose flour (for initial mixture)
- 1 1/4 cups warm water (for dough)
- 1 tablespoon sugar
- 1 teaspoon salt
- 3 1/2 cups all-purpose flour (for dough)
- Olive oil (for greasing)
Instructions:
Activating the Yeast:
- In a small bowl, combine 1/4 cup warm water and dry yeast. Let it sit for about 5-10 minutes, or until the yeast becomes frothy and activated.
- Stir in 1/3 cup of all-purpose flour to create a thick paste-like mixture. Cover the bowl with a clean kitchen towel and let it rest in a warm, draft-free place for about 30 minutes, or until the mixture doubles in size.
Preparing the Dough:
- In a large mixing bowl, combine the activated yeast mixture with 1 1/4 cups warm water, sugar, and salt. Stir until the sugar and salt are dissolved.
- Gradually add 3 1/2 cups of all-purpose flour to the wet ingredients, stirring until a sticky dough forms.
- Turn the dough out onto a lightly floured surface and knead it for about 8-10 minutes, or until it becomes smooth and elastic.
- Place the kneaded dough in a greased bowl, turning it to coat all sides with olive oil. Cover the bowl with plastic wrap or a clean kitchen towel and let it rise in a warm, draft-free place for about 1-2 hours, or until it doubles in size.
Baking the Bread:
- Once the dough has risen, gently punch it down to release any air bubbles. Turn it out onto a lightly floured surface and shape it into a loaf.
- Place the shaped loaf onto a greased or parchment-lined baking sheet. Cover it loosely with plastic wrap or a clean kitchen towel and let it rise for an additional 30-45 minutes, or until it puffs up slightly.
- Preheat your oven to 375°F (190°C). Remove the plastic wrap or towel from the risen loaf and slash the top with a sharp knife to allow for expansion during baking.
- Bake the bread in the preheated oven for 30-35 minutes, or until it is golden brown and sounds hollow when tapped on the bottom.
- Remove the bread from the oven and transfer it to a wire rack to cool completely before slicing and serving.
Cook Notes and Variations:
- Flour Selection: While all-purpose flour works well for this recipe, you can experiment with different types of flour for unique flavors and textures. Whole wheat flour, bread flour, or a combination of flours can all be used to create different variations of homemade bread.
- Adding Flavors: Get creative with your homemade bread by adding herbs, spices, or other flavorings to the dough. Try mixing in chopped rosemary, garlic powder, or shredded cheese for a savory twist, or add cinnamon and raisins for a sweet variation.
- Shaping Techniques: The possibilities are endless when it comes to shaping homemade bread. From classic sandwich loaves to rustic boules and braided rolls, experiment with different shaping techniques to create beautiful and delicious breads.
Keto and Low-Carb Versions:
- Keto Version: While traditional bread recipes are typically high in carbohydrates, you can make a keto-friendly version by using low-carb flours such as almond flour, coconut flour, or a combination of both. Substitute the all-purpose flour with keto-friendly flour alternatives, and use a sugar substitute instead of sugar in the dough.
- Low-Carb Version: Similarly, for a low-carb option, you can use a combination of almond flour and flaxseed meal to create a lower-carb bread. Reduce the amount of sugar or use a sugar substitute, and be mindful of the carb content in any additional flavorings or mix-ins.
There’s nothing quite like the satisfaction of baking your own homemade bread from scratch. With just a handful of simple ingredients and a little bit of time and patience, you can create delicious loaves of bread that are perfect for any occasion. Whether you’re a seasoned baker or a novice in the kitchen, give this homemade bread recipe a try and enjoy the delicious results!
Frequently Asked Questions (FAQs):
Q: Can I use instant yeast instead of dry yeast? A: Yes, you can substitute instant yeast for dry yeast in this recipe. Keep in mind that instant yeast may require less time to activate, so adjust the resting time accordingly.
Q: How do I know when the dough has risen enough? A: The dough should roughly double in size during the rising process. You can test if the dough has risen enough by gently poking it with your finger. If the indentation remains, the dough is ready to be shaped and baked.
Q: Can I freeze homemade bread? A: Yes, homemade bread can be frozen for later use. Allow the bread to cool completely, then wrap it tightly in plastic wrap and aluminum foil before placing it in a freezer bag or container. Thaw the bread at room temperature before serving.
Q: Can I add seeds or grains to the dough? A: Yes, you can add seeds such as sesame seeds, poppy seeds, or sunflower seeds, as well as grains like oats or quinoa, to the dough for added texture and flavor. Mix them in during the kneading process.
Q: Can I use a bread machine to make this recipe? A: Yes, you can use a bread machine to mix and knead the dough for this recipe. Follow the manufacturer’s instructions for adding the ingredients and selecting the appropriate setting.
Q: How should I store leftover homemade bread? A: To keep homemade bread fresh, store it in a paper bag or bread box at room temperature for up to 2-3 days. Avoid storing bread in the refrigerator, as it can cause the bread to become stale more quickly.
Q: Can I make smaller or larger loaves of bread with this recipe? A: Yes, you can adjust the size of the loaves by dividing the dough into smaller or larger portions before shaping. Keep in mind that smaller loaves will require less baking time, while larger loaves may need additional time in the oven.
Q: Can I make this bread recipe gluten-free? A: Yes, you can make gluten-free bread by using a gluten-free flour blend in place of the all-purpose flour. Look for a gluten-free flour blend that is specifically designed for bread baking for the best results.
Q: Can I add cheese or herbs to the dough for extra flavor? A: Yes, you can customize the flavor of your homemade bread by adding cheese, herbs, or other flavorings to the dough. Fold them into the dough during the kneading process for even distribution.
Q: Can I use this recipe to make dinner rolls or buns? A: Absolutely! This versatile dough can be shaped into dinner rolls, buns, or even braided loaves for different variations of homemade bread. Adjust the baking time accordingly based on the size and shape of the bread.
With this comprehensive guide, you have all the tools and knowledge you need to embark on your homemade bread baking journey. From the basic recipe to FAQs and variations, let your creativity shine as you create delicious loaves of bread to share with family and friends!


