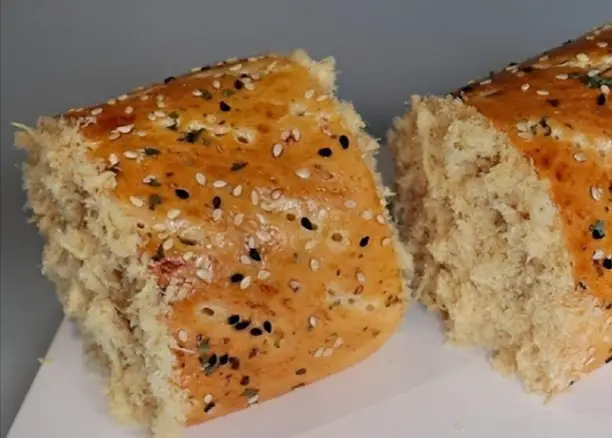
Are you looking to impress your family and friends with a delightful homemade bread recipe? Look no further than this Floss Roll Bread Recipe! With its fluffy texture and delicious chicken floss filling, this homemade floss bread will surely become a favorite in your household. Let’s dive into the recipe and learn how to make this scrumptious treat!
Ingredients:
- 1/3 cup sugar (60g)
- 1 tsp yeast (5g)
- 170ml water
- 2 cups all-purpose flour (300g)
- Pinch of salt
- 15g margarine
- 1 whole egg
- Yellow food color (optional)
- White sesame
- Black sesame
- Parsley
- Mayonnaise
- Chicken floss
- 2 sausages
Instructions:
Preparing the Dough:
- Activating the Yeast: In a small bowl, combine the yeast, sugar, and warm water (around 110°F/43°C). Stir gently and let it sit for about 5-10 minutes until the mixture becomes frothy and bubbly.
- Mixing the Dough: In a large mixing bowl, sift together the all-purpose flour and salt. Add the activated yeast mixture and margarine. Mix until a dough forms.
- Kneading the Dough: Transfer the dough onto a lightly floured surface. Knead the dough for about 8-10 minutes until it becomes smooth and elastic.
- First Rise: Place the kneaded dough into a greased bowl, cover it with a clean kitchen towel or plastic wrap, and let it rise in a warm, draft-free place for about 1 hour or until it doubles in size.
Shaping and Filling the Bread:
- Preparing the Filling: Cook the sausages until they are fully cooked. Slice them thinly and set aside.
- Rolling the Dough: Once the dough has doubled in size, punch it down to release the air bubbles. Transfer the dough to a floured surface and roll it out into a rectangle.
- Adding the Filling: Spread a layer of mayonnaise over the rolled-out dough. Sprinkle a generous amount of chicken floss evenly over the mayonnaise. Arrange the sliced sausages on top of the chicken floss.
- Rolling Up the Dough: Starting from one end, tightly roll up the dough into a log shape. Pinch the seams to seal.
- Cutting the Rolls: Using a sharp knife, slice the rolled dough into individual rolls, each about 2 inches thick.
- Second Rise: Place the rolls onto a baking tray lined with parchment paper. Cover them with a kitchen towel and let them rise for another 30-45 minutes.
Baking and Garnishing:
- Preheating the Oven: While the rolls are rising, preheat your oven to 350°F (175°C).
- Brushing with Egg Wash: In a small bowl, whisk together the whole egg and a few drops of yellow food color (optional). Brush the tops of the rolls with the egg wash.
- Sprinkling Toppings: Sprinkle white and black sesame seeds over the tops of the rolls for added flavor and visual appeal. Garnish with chopped parsley.
- Baking: Place the baking tray in the preheated oven and bake the rolls for 15-20 minutes or until they are golden brown and fully cooked.
- Cooling and Serving: Once baked, remove the rolls from the oven and let them cool on a wire rack for a few minutes. Serve warm and enjoy!
Cook Notes and Variations:
- Vegetarian Version: Skip the sausages for a vegetarian-friendly option. You can also add your favorite vegetables or meat alternatives to the filling.
- Sweet Variation: Instead of savory fillings, you can fill the rolls with sweet ingredients such as Nutella, jam, or sweetened cream cheese for a dessert-inspired treat.
FAQs (Frequently Asked Questions):
- Can I make this recipe without eggs? Yes, you can omit the egg wash and yellow food color from the recipe. The rolls will still turn out delicious without them.
- Can I use other fillings for the rolls? Absolutely! Feel free to get creative with the fillings. You can use shredded chicken, tuna, cheese, or any other ingredients you prefer.
- How should I store leftover rolls? Store any leftover rolls in an airtight container or resealable bag at room temperature for up to 2-3 days. You can also freeze the rolls for longer storage and reheat them in the oven or microwave before serving.
In conclusion, this Floss Roll Bread Recipe is a fantastic way to enjoy the delicious combination of fluffy bread and savory fillings right at home. Whether you’re serving them as a snack, appetizer, or side dish, these homemade floss rolls are sure to impress your taste buds and leave you craving for more. Give this recipe a try and elevate your baking game with these delightful treats!
