Revisit the culinary trends of the 70s and 80s with a dessert that delighted taste buds and added a splash of color to any gathering: the Strawberry Jelly Cubes Cake. This vintage treat combines the simplicity of jelly with a creamy twist, making it a timeless favorite. Whether you’re hosting a retro-themed party or simply want to introduce a classic dessert to your loved ones, this Strawberry Jelly Cubes Cake is sure to impress. Let’s dive into this easy-to-follow recipe and bring a touch of nostalgia to your dessert table.
Ingredients
To recreate this delightful dessert, you’ll need the following ingredients:
- 4 packets of strawberry jelly powder
- 350 ml hot water (divided)
- 400 ml cold water (divided)
- 400 g light cream
- Drizzle of vegetable oil
Instructions
Step 1: Prepare the Jelly Cubes
- Mix Jelly Powder: Begin by adding two packets of strawberry jelly powder into a bowl.
- Add Hot Water: Pour 250 ml of hot water into the bowl. Stir the mixture until the jelly powder is completely dissolved.
- Add Cold Water: Follow up by adding 250 ml of cold water to the mixture. Stir until well combined.
Step 2: Set the Jelly
- Prepare the Dish: Lightly drizzle a bit of vegetable oil in a square or rectangular dish. Use a sheet of paper towel to spread the oil evenly. This step ensures the jelly won’t stick to the dish.
- Pour Jelly: Pour the jelly mixture into the prepared dish.
- Chill: Place the dish in the fridge and let it chill for at least two hours, or until the jelly is firm.
Step 3: Cut and Release Jelly Cubes
- Cut Cubes: Once the jelly is set, cut it into small cubes using a sharp knife.
- Release Cubes: Use a spatula to gently release the jelly cubes from the bottom of the dish.
Step 4: Prepare the Cake Tin
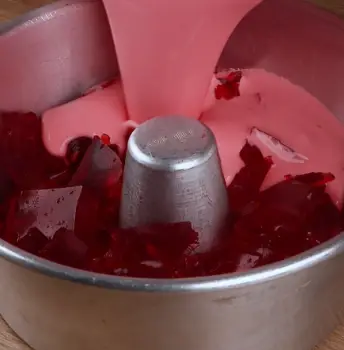
- Add Jelly Cubes: Arrange all the jelly cubes into a 20 cm diameter ring cake tin, ensuring they are distributed evenly.
Step 5: Make the Creamy Jelly Mixture
- Mix Jelly Powder: In a medium bowl, add the remaining two packets of strawberry jelly powder.
- Add Hot Water: Pour 100 ml of hot water into the bowl. Stir until the jelly powder is fully dissolved.
- Add Cold Water: Add 150 ml of cold water and stir until well combined.
- Add Cream: Pour in the 400 g of light cream and mix thoroughly until the mixture is smooth and fully incorporated.
Step 6: Assemble the Cake
- Pour Mixture: Carefully pour the creamy jelly mixture over the jelly cubes in the cake tin. Make sure the mixture fills all the gaps between the cubes.
- Chill: Place the cake tin in the fridge and let it chill for another two hours, or until the mixture is completely set.
Step 7: Serve
- Release Cake: Once set, carefully release the cake from the tin. If needed, run a knife around the edge to help release it.
- Serve: Cut into slices and serve chilled.
Tips for Perfect Jelly Cubes Cake
- Dissolving Jelly Powder: Ensure the jelly powder is fully dissolved in the hot water to avoid any grainy texture.
- Chilling Time: Adhere to the recommended chilling time to ensure the jelly sets properly and holds its shape.
- Creamy Mixture: Stir the creamy mixture thoroughly to achieve a smooth and consistent texture.
Variations
Fruit Mix-In:
- Enhance the flavor and texture by adding small pieces of fresh strawberries or other fruits to the jelly cubes before setting.
Different Flavors:
- Experiment with different flavors of jelly powder to create a colorful and multi-flavored dessert. Options like lemon, lime, or orange can add a fun twist.
Light Cream Substitute:
- For a richer version, consider substituting light cream with heavy cream or even condensed milk. This will give the dessert a more luxurious and creamy texture.
The Strawberry Jelly Cubes Cake is a delightful blast from the past that will surely bring back fond memories and create new ones. This visually appealing and refreshing dessert is perfect for family gatherings, parties, or any time you want to indulge in a sweet treat. The combination of vibrant jelly cubes and creamy jelly mixture creates a unique and satisfying dessert that stands the test of time. Thank you for joining me on this nostalgic culinary journey. Enjoy making and sharing this recipe, and I’ll see you next time with another delicious treat. Bye!


