This vintage bread recipe is a true gem from the 70s and 80s, known for its unique preparation and delicious taste. If you haven’t tried making bread like this before, now is the perfect time to bring a bit of the past into your kitchen. Let’s dive into the step-by-step instructions and create a bread that’s sure to impress everyone.
Ingredients
- 1/2 cup melted butter
- 1/2 cup olive oil
- 1 tablespoon sugar
- 10 grams organic yeast
- 2 cups warm water
- 3 cups wheat flour
- Grated mozzarella (for filling)
- 1 egg yolk (for brushing)
- Sesame seeds (for topping)
Instructions
Step 1: Prepare the Pan and Initial Dough
- Prepare the Pan:
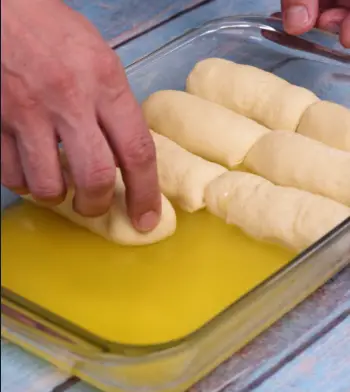
- Start by pouring 1/2 cup of melted butter and 1/2 cup of olive oil into your baking pan. This will create a rich, flavorful base for the bread.
- Activate the Yeast:
- In a separate bowl, combine 1 tablespoon of sugar, 10 grams of organic yeast, and 2 cups of warm water. Mix well to dissolve the sugar and yeast. Let it sit for about 5 minutes to allow the yeast to activate.
- Mix the Dough:
- Gradually add 3 cups of wheat flour to the yeast mixture. Use your hands to mix and knead the dough until it is smooth and elastic. This may take about 10 minutes of kneading.
Step 2: First Rise and Dough Preparation
- First Rise:
- Cover the dough with a clean cloth or plastic wrap and let it rest for 30 minutes in a warm place. This will allow the dough to rise and double in size.
- Knead and Shape:
- Once the dough has risen, transfer it to a lightly floured surface. Roll the dough into a log shape and then divide it into equal portions, depending on the size of your baking tin.
Step 3: Fill and Shape the Bread
- Fill with Mozzarella:
- Take each portion of the dough, flatten it with your hands, and place a generous amount of grated mozzarella in the center. Roll the dough around the cheese, ensuring it is well sealed, and then shape it into a “tail” form.
- Arrange in the Pan:
- Place the first “tail” in the center of your prepared baking pan.
- Continue with the remaining dough portions, arranging them around the first piece to form a spiral or concentric circles.
Step 4: Second Rise and Final Touches
- Second Rise:
- Cover the arranged dough with plastic wrap and let it rest for another 20 minutes. This second rise will help the dough become even fluffier.
- Prepare for Baking:
- After the second rise, remove the plastic wrap. Take each piece of dough, place it on the table, and gently open it with your hands.
- Brush with Egg Yolk:
- Brush the top of the dough with egg yolk to give it a beautiful golden color when baked. Sprinkle sesame seeds on top to add a delightful crunch.
Step 5: Baking
- Bake the Bread:
- Preheat your oven to 350 degrees Fahrenheit (175 degrees Celsius).
- Bake the bread for 30 minutes, or until it is golden brown and cooked through.
Step 6: Serve and Enjoy
- Cool and Serve:
- Once baked, remove the bread from the oven and let it cool slightly before serving. The melted mozzarella inside will be a delightful surprise with each bite.
- Enjoy:
- Slice and serve this nostalgic bread with your favorite spreads or alongside a hearty meal. Its rich, buttery flavor and cheesy filling make it perfect for any occasion.
Tips and Tricks
- Active Yeast: Make sure your yeast is active and not expired. This ensures the dough will rise properly.
- Kneading: Proper kneading is crucial for the dough’s texture. It should be smooth and elastic before the first rise.
- Resting Time: Allow the dough to rest and rise adequately. This will result in a fluffy, airy bread.
- Cheese Filling: Feel free to experiment with different types of cheese for the filling. Cheddar, gouda, or even a mix of cheeses can add a unique twist.
This vintage bread recipe from the 70s and 80s is a delightful treat that combines the simplicity of ingredients with a unique preparation method. The buttery base, cheesy filling, and fluffy dough make it a standout dish that will bring back nostalgic memories or create new ones. Try this recipe at home, share it with friends and family, and enjoy the delicious taste of the past. Happy baking!


