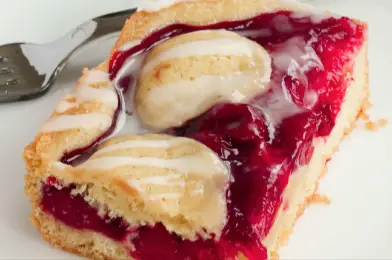
Dive into a world of sweet indulgence with our recipe for Cherry Bars. These delightful treats are bursting with the vibrant flavors of cherry pie filling, nestled atop a buttery crust and finished with a luscious glaze. Perfect for any occasion, from picnics to potlucks, these Cherry Bars are sure to be a hit with friends and family alike. Join us as we embark on a culinary journey to create these irresistible bars that are as easy to make as they are to devour!
Ingredients:
- 2 ¼ cups all-purpose flour
- ½ teaspoon salt
- ½ teaspoon baking soda
- ½ teaspoon baking powder
- 3/4 cup unsalted butter, softened
- 1 cup granulated sugar
- 3 large eggs
- 1 teaspoon vanilla extract
- ¼ teaspoon almond extract
- 1 21-ounce can of cherry pie filling
Glaze:
- 1 cup powdered sugar
- ½ teaspoon vanilla extract
- ¼ teaspoon almond extract
- 2-3 tablespoons milk, half and half, or water (see notes)
Instructions:
- Preheat Oven: Preheat your oven to 350°F (175°C) and grease a 9×13-inch baking dish.
- Prepare Crust: In a mixing bowl, whisk together the all-purpose flour, salt, baking soda, and baking powder. Set aside.
- Cream Butter and Sugar: In a separate mixing bowl, cream together the softened butter and granulated sugar until light and fluffy.
- Add Eggs and Extracts: Beat in the eggs, one at a time, followed by the vanilla extract and almond extract, until well combined.
- Incorporate Dry Ingredients: Gradually add the dry ingredients to the wet ingredients, mixing until a soft dough forms.
- Assemble Bars: Press two-thirds of the dough evenly into the bottom of the prepared baking dish to form the crust layer.
- Spread Cherry Filling: Spread the cherry pie filling evenly over the crust layer in the baking dish.
- Create Top Crust: Drop small spoonfuls of the remaining dough over the cherry filling, spreading it out as evenly as possible to create a crumbly top crust.
- Bake: Bake in the preheated oven for 30-35 minutes, or until the edges are golden brown and the center is set.
- Cool and Glaze: Allow the Cherry Bars to cool completely in the baking dish. In the meantime, prepare the glaze by whisking together the powdered sugar, vanilla extract, almond extract, and milk until smooth. Drizzle the glaze over the cooled bars.
- Slice and Serve: Once the glaze has set, slice the Cherry Bars into squares and serve. Enjoy the irresistible combination of buttery crust, sweet cherry filling, and decadent glaze!
Cook Notes and Variations:
- Nutty Crunch: Add chopped nuts such as almonds or pecans to the dough for added texture and flavor.
- Fruit Variation: Experiment with different pie fillings such as blueberry, peach, or apple for a variety of fruity flavors.
- Chocolate Drizzle: For an extra indulgent touch, drizzle melted chocolate over the cooled bars in addition to or instead of the glaze.
Keto and Low-Carb Versions:
Keto Version: To make a keto-friendly version of Cherry Bars, substitute almond flour or coconut flour for the all-purpose flour and use a keto-friendly sweetener such as erythritol or stevia in place of granulated sugar. Replace the cherry pie filling with a homemade keto-friendly version made with fresh or frozen cherries and a low-carb sweetener. For the glaze, use powdered erythritol or powdered monk fruit sweetener in place of powdered sugar and adjust the amount of liquid as needed to achieve the desired consistency.
Low-Carb Version: For a lower-carb version, reduce the amount of granulated sugar used in the recipe and use a low-carb sweetener such as erythritol, stevia, or monk fruit sweetener. Opt for a sugar-free cherry pie filling or make your own using fresh or frozen cherries and a low-carb sweetener. You can also decrease the amount of flour used in the crust and increase the proportion of almond flour or coconut flour to further reduce the carb content.
In conclusion, Cherry Bars are a delightful dessert that combines the irresistible flavors of sweet cherries, buttery crust, and decadent glaze into one irresistible treat. Whether enjoyed as a midday snack, dessert, or sweet indulgence, these bars are sure to satisfy your cravings and leave you longing for more. With simple ingredients and easy preparation, you can whip up a batch of Cherry Bars to share with loved ones or enjoy all to yourself. So gather your ingredients, preheat your oven, and get ready to indulge in the sweet bliss of Cherry Bars!
Frequently Asked Questions (FAQs):
Q: Can I use fresh cherries instead of cherry pie filling? A: Yes, you can use fresh cherries in place of cherry pie filling for a more homemade touch. Simply pit and chop the cherries, toss them with a bit of sugar or sweetener, and spread them evenly over the crust layer.
Q: Can I freeze Cherry Bars for later? A: Yes, Cherry Bars can be frozen for up to 2-3 months. Wrap individual bars tightly in plastic wrap or aluminum foil, then place them in a freezer-safe bag or container. Thaw in the refrigerator overnight before serving.
Q: Can I omit the almond extract from the glaze? A: Yes, you can omit the almond extract from the glaze if you prefer. Simply increase the amount of vanilla extract to compensate for the missing flavor.
Q: Can I make Cherry Bars without the glaze? A: Absolutely! While the glaze adds an extra layer of sweetness and flavor, you can certainly enjoy Cherry Bars without it. Simply skip the glaze step and enjoy the bars as they are, or dust them with powdered sugar for a simple finishing touch.


